Are you using or planning to buy a Karaoke System like MagicSing ET23KH, Kortek Magic Mike, or Persang Karaoke New Dzire Plus, like the one shown above? These systems generally have the following features.
- Built in karaoke tracks with lyrics display
- Microphones with echo effect to sing
These are very convenient all-in one systems for creating an affordable Karaoke setup at home. Just connect it to a TV and your home karaoke setup is ready. Pick a song, and its background music is played on the TV along with the scrolling lyrics. Sing along the track using the microphone and your voice is also relayed to the TV speakers. Its very easy to setup, simple to use, and provides hours of fun at home.
However, setting up your karaoke system at home still needs careful steps, else you may encounter poor sound problems. For example, you may hear two distinct sounds for your own vocals, one what you sing and one from the TV speaker, and this creates an undesired echo effect that makes it difficult to sing and also results in a sound that is not very pleasant to hear. Let us go through some points to know while setting up your Karaoke System at home so that you get best sound from your system.
How Does a Karaoke System Work?
Let us first try to understand how a Karaoke machine works. The Karaoke system plays your selected background music tracks and outputs the scrolling lyrics as a video signal, and the music as audio signal. These audio / video signals need to be played on an external device. When you connect your TV to the Karaoke machine, the video is displayed on TV screen and the audio is played on the speaker built in the TV. As you You look at the lyrics on the screen, listen to the background music and sing along, the Karaoke machine takes the vocal sound picked up by the mic, mixes it with the music track and sends it out as audio signal. So you can hear the mixed song sound on TV speaker.
Analog Audio/Video
These Karaoke systems were originally designed for older generation TVs that have Analog Video and Audio. The Analog Audio / Video from Karaoke system was connected to the TV using the RCA Audio/Video (3 connector) cable as shown below. This system has good sound quality as the delay in analog system is negligible.
Digital Audio/Video
Later on as digital TVs came in the market, we started connecting the digital audio / video output from the Karaoke system to the TV via an HDMI cable. Please see the figure below. This causes a problem in the sound quality as the digital audio processing in the TV adds some delay to it. Hence the sound coming out of the TV speaker is delayed. When you sing, you will hear two sounds, your own voice and a delayed output from the TV. This results in a very poor quality sound experience from the Karaoke system.
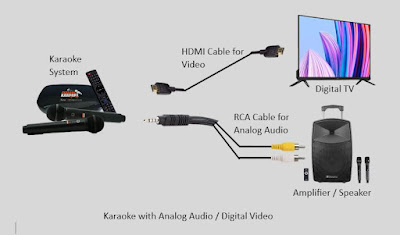
Analog Audio / Digital Video
What can you do to restore sound quality? We cannot get analog TVs anymore in the market, but analog sound amplifiers and speakers are commonly available. Therefore, the solution requires adding a speaker with built in analog amplifier to your system. One possible choice is Persang Octane 9 Premium Trolley Speaker, available easily from Amazon. However, you can pick any speaker with a built-in amplifier that fits your budget. Just make sure it supports RCA aux audio inputs.
Recommended Home Karaoke Setup
Connect the digital video from Karaoke machine to your TV using HDMI cable and keep your TV on mute so that no sound comes from its speaker. Now use the RCA cable to connect the analog output from Karaoke machine to the external speaker. Usually white and red plugs are used for audio. Leave the yellow video plug unconnected. Check the manual of your Karaoke machine if in doubt. Go to settings on your Karaoke machine and select analog audio output. Your home karaoke system is ready now. Enjoy karaoke singing at home.
One more thing, if you buy an speaker like Persang Octane 9 Premium Trolley Speaker, you will also get two wireless mics with it that have very good quality. You can use these mics also to sing along.
Try this setup for yourself and if you have any questions, let me know through comments on this post. And if you find this post helpful, remember to follow my blog.


No comments:
Post a Comment
Did you like this post? Please leave a comment - your feedback gives me encouragement for writing. Please subscribe to my blog to support it. - Sanjay